If you have finished artwork
Please check these 5 items before submitting. If anything needs fixing, our team will contact you before printing and finishing begin.
Check the 5 items →Everything you need to check before submitting your artwork, and how to prepare your files — organized so you only need to look at what applies to you.
Please check these 5 items before submitting. If anything needs fixing, our team will contact you before printing and finishing begin.
Check the 5 items →No problem if your design isn't finalized yet. Use generative AI to create a reference image from your logo, and send it to us along with your logo file. We'll create the print-ready design for you.
Generative AI Guide
It's fine if you don't have a design idea yet
Upload your logo to ChatGPT or a similar tool to easily create a photo-realistic card mockup or a flat design proof. You don't need to create professional print-ready data yourself.
Upload your company, store, or brand logo image to ChatGPT or another generative AI tool. A PNG with a transparent background works best.
Enter the card's purpose, colors, mood, and the content you want included, and specify either "a photo-realistic mockup image" or "a flat design proof."
Give feedback such as "make it simpler" or "make the logo bigger" until the result is close to what you want.
Save the original logo file and the AI reference image, and submit them together.
Please send your logo image and the AI reference image together. We don't print the AI image as-is — our team rebuilds it into print-ready data.
Please send the original logo image, the AI reference image, any photos, and the correct text content to include.
Based on the AI reference image, we use your correct logo and text to create print-ready data with the right size, resolution, and bleed.
You'll review the finished design proof, and we'll make revisions as needed.
Once you approve the final design, we begin printing and finishing the cards.
*AI-generated images are reference material to communicate design direction, not finished print data. Text and logos within the image may not be accurate, so please always send the original logo file and correct text content along with it. Please also be mindful of the terms of use for generative AI tools and the rights of any third-party logos, characters, or photos.
Pre-Submission Check
Please check these 5 items first. Detailed creation methods are covered in the guide below.
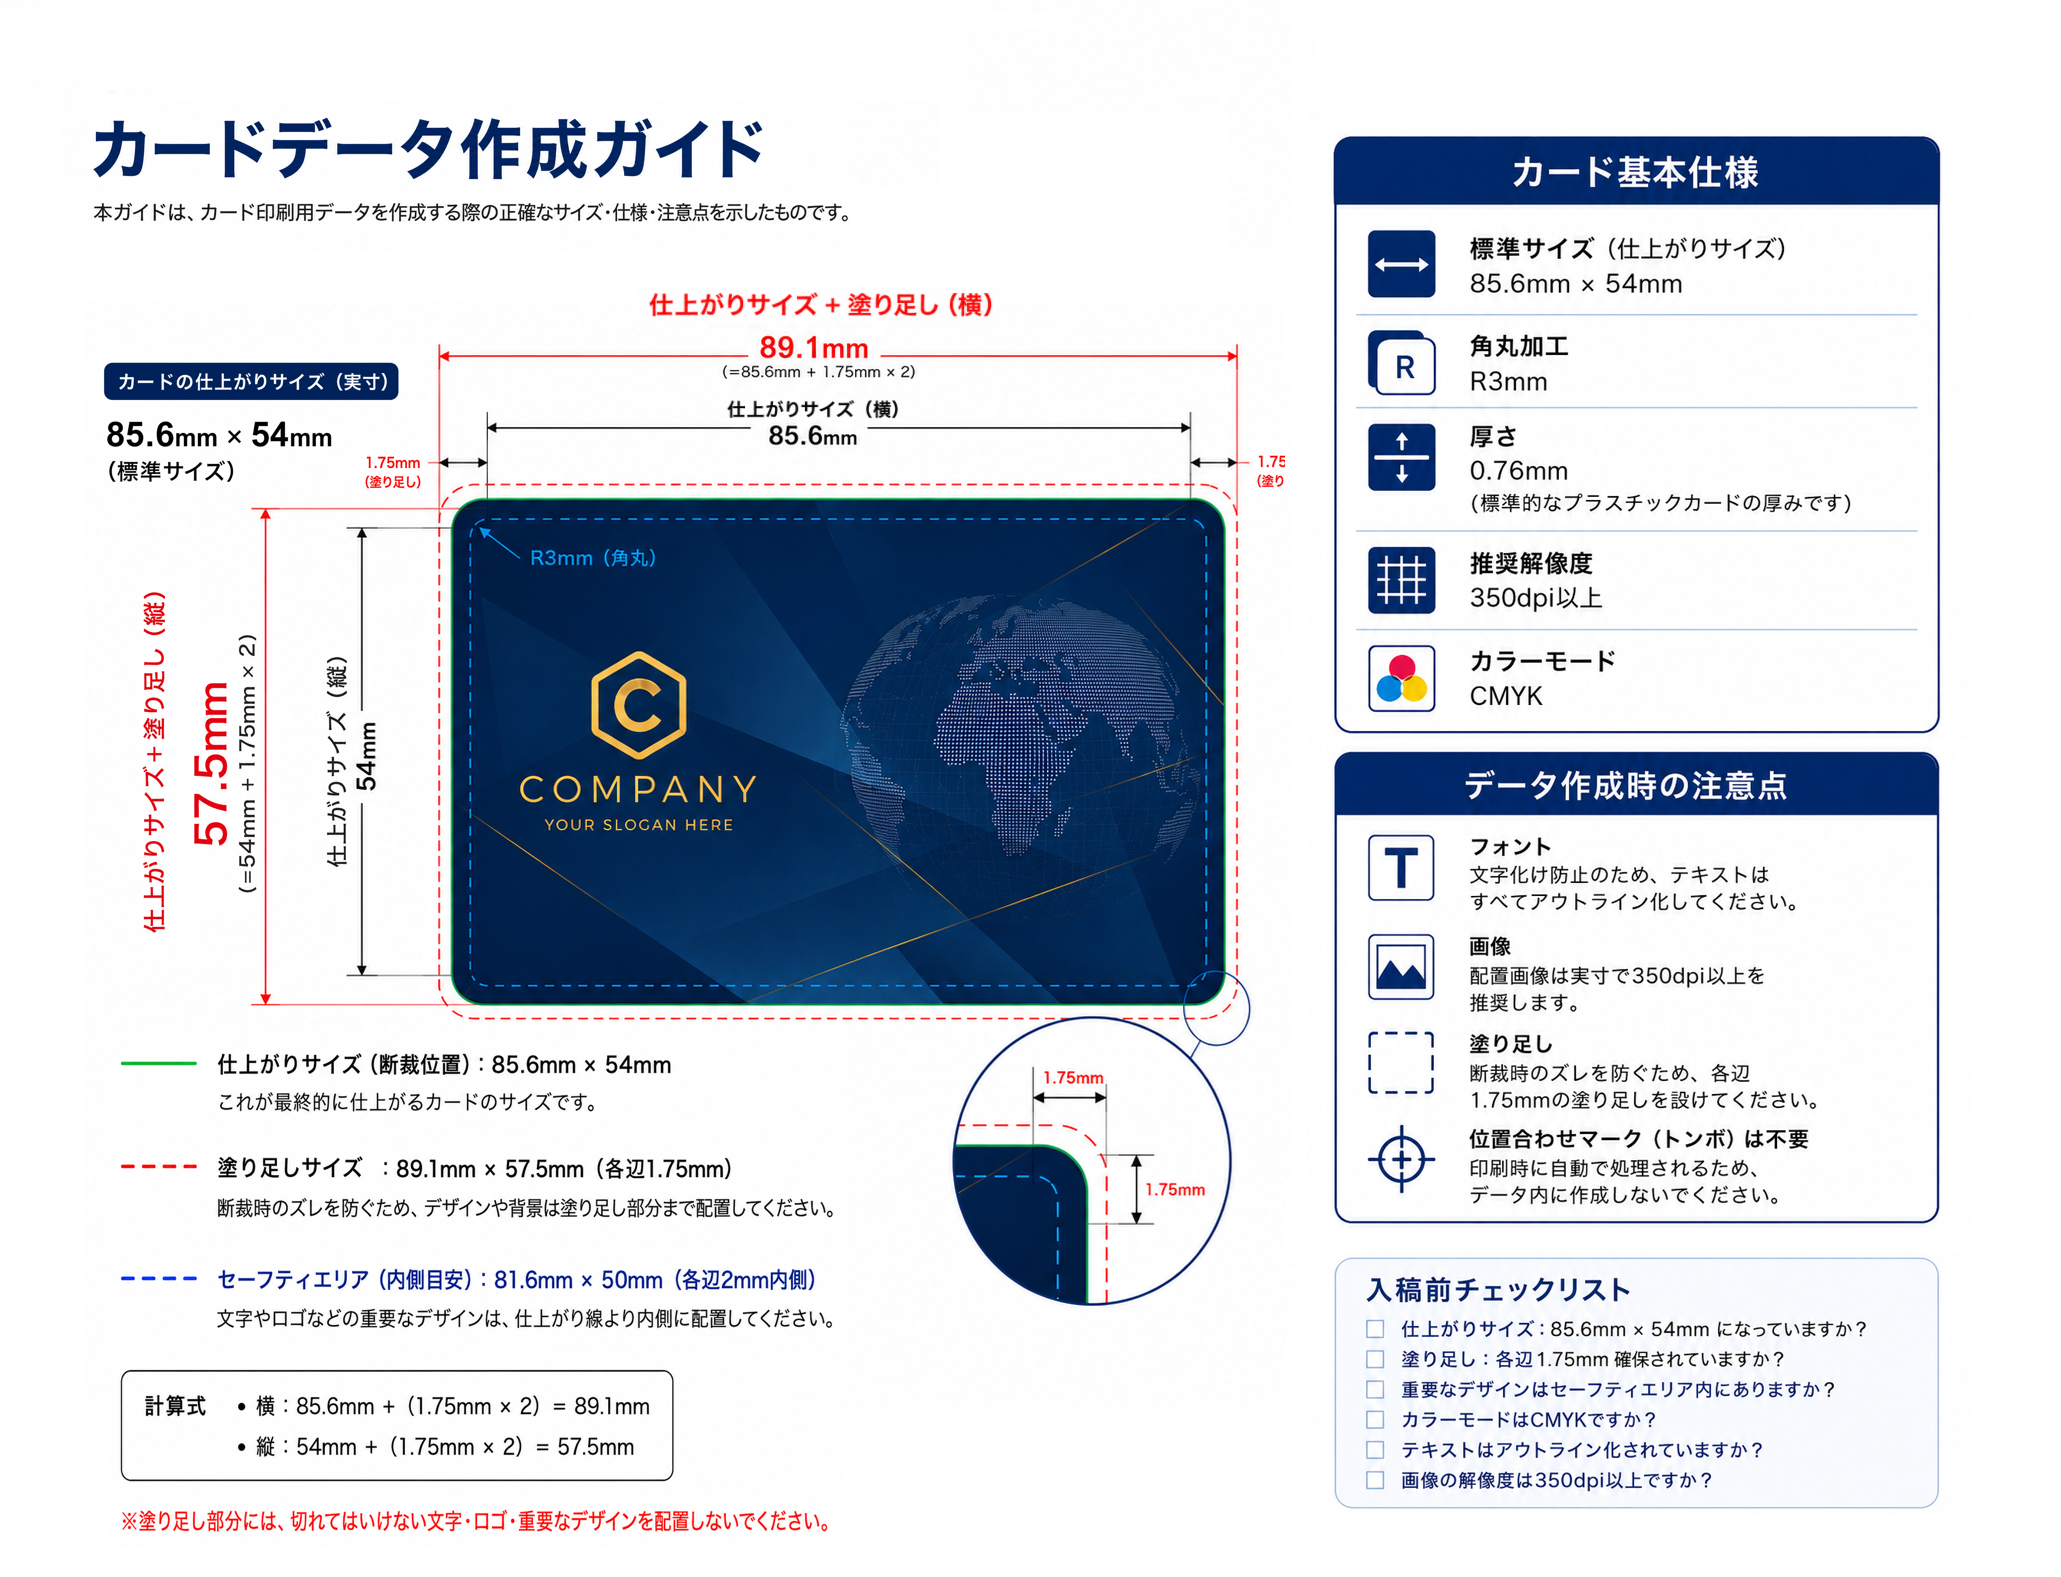
Please create standard card artwork at 89.1 × 57.5mm, including bleed.
CMYK is recommended. RGB submissions are accepted, but colors may shift during conversion.
Please outline all text to prevent garbled characters or font substitution.
Please embed images at 350dpi or higher, at the actual size used.
Please double-check names, numbers, QR codes, front/back, and any cropped text before submitting.
Visual Reference
This section covers the basics of artwork creation and how to prepare photos for employee/ID cards.
See size, bleed, safe area, and color mode all in one image.
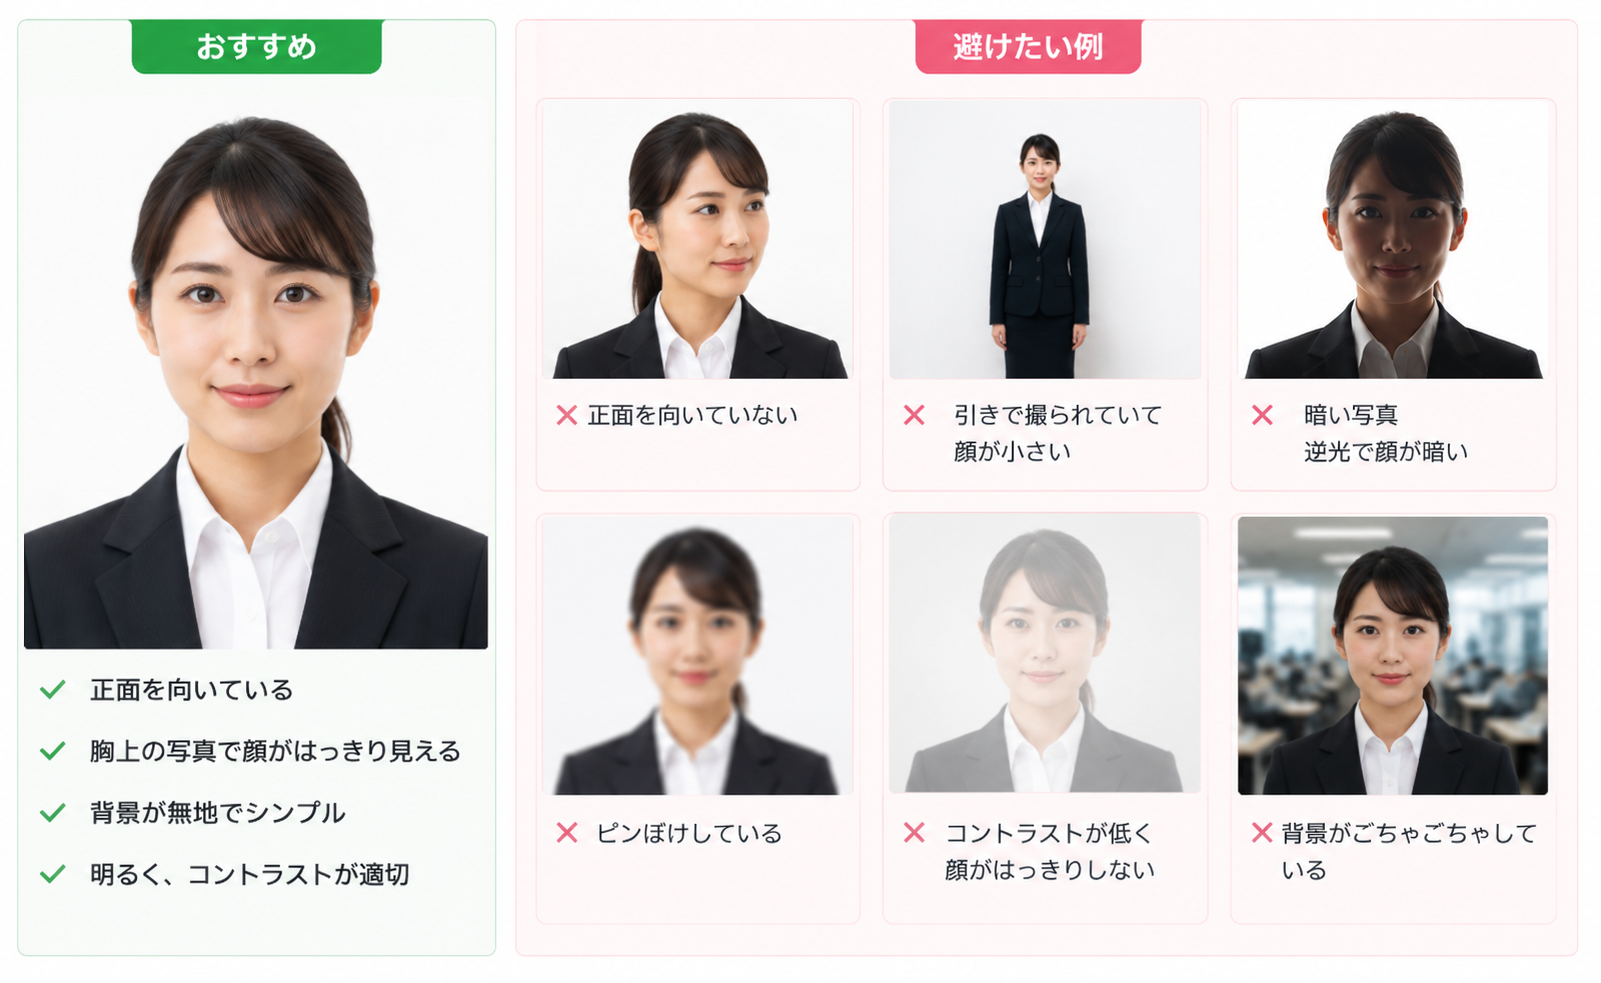
See the difference between recommended photos and photos that don't come out well on a printed card.
Detailed Guide
Detailed explanations for everything are collected here. Select a topic to expand it.
・Finished size: 85.6mm × 54mm
・Artboard size (including bleed): 89.1mm × 57.5mm
・Color mode: CMYK
・Resolution: 350ppi
・Set a 1.75mm bleed area on all four sides.
・Set a "safe area" guide 1.75mm inside the finished size.
* Place important elements that must not be cut off, such as text and logos, within the safe area.
・Place your background, images, and text.
・Background colors and images must always extend all the way to the outer bleed area.
・Select all text and run [Type] → [Create Outlines].
* This step is required to prevent garbled characters and ensure printing in the correct typeface.
・Recommended format: PDF (PDF/X-4)
・Export with crop marks, without compressing images.
・Finished size: 85.6mm × 54mm
・Artboard size (including bleed): 89.1mm × 57.5mm
・Resolution: 350dpi
・Color mode: CMYK
* For accurate sizing, please set your units to "mm" when creating the document.
・Set a 1.75mm bleed area on all four sides.
・Set a "safe area guide" 1.75mm inside the finished size for placing important elements.
・Keep the background, images, and text on separate layers, grouping them into folders as needed.
・Creating your file in CMYK is recommended. With RGB, colors may shift during CMYK conversion.
・Total ink coverage (TAC value): 300% or lower is recommended.
・Recommended format: PSD (keeping layers where possible) or high-quality PDF
・For JPG/PNG, please provide high-resolution data at the size including bleed.
(For orders such as employee or student ID cards that require individual printing)
For orders involving individual printing (variable data printing), please prepare "portrait photos" and a "roster list" separately from your design artwork.
To ensure accurate matching, please help us by naming your files correctly.
File name: Use a unique management number, such as the employee number from your roster (e.g. 1001.jpg). If using names instead, please watch out for duplicate names.
Recommended photo resolution: 300dpi or higher (front-facing, no headwear, plain background). For full card design images, 350dpi or higher is recommended.
* When shooting with a smartphone, please avoid digital zoom and shoot in a well-lit location.
Each row in your roster corresponds to one card.
Supported formats: Excel (.xlsx) or CSV (UTF-8)
Special/legacy characters: If a name includes special kanji variants, please let us know separately to prevent garbled text.
If you already have roster data or a management sheet, you're welcome to send it as-is.
We'll format it into a format that's easy for us to work with.
* RGB data is converted to CMYK during printing, so colors may shift.
* We cannot guarantee an exact color match in the finished product. Thank you for your understanding.
[Vector Data (Recommended)]
Formats: Illustrator (.ai) / PDF
Required: Please outline all text.
Size: Please create your artwork including the bleed size (89.1mm × 57.5mm).
[Image Data]
Formats: JPG / PNG / PSD
Resolution: 350dpi or higher for card designs
Color mode: CMYK recommended (RGB is also accepted, but colors may shift during conversion)
For PSD files: please submit with layers preserved wherever possible.
・Bleed: to prevent white edges from appearing when trimmed, add 1.75mm of bleed on all four sides outside the finished size (total 89.1×57.5mm).
・Placement: important elements such as text and logos should be placed inside the finished size (85.6mm × 54mm).
・About trimming: slight variation can occur during the trimming process. Please allow some margin when placing your design.
・If there are issues with your submitted artwork, printing and finishing may be delayed.
・Once the final design is approved, changes or cancellations cannot be accepted.
・RGB data is converted to CMYK during printing, so colors may shift.
・We cannot guarantee an exact color match in the finished product. Thank you for your understanding.
Please note the following when producing functional cards.
* We may ask you to resubmit low-resolution or blurry photos. Thank you for your understanding.
We support individual printing of the following items.
Roster data: CSV / Excel (please create with 1 row = 1 card)
Character encoding: UTF-8 is recommended to prevent garbled text.
Pro tip:
Our specialist staff will run a quick check on your submitted data. In the rare case we find a significant issue that would affect printing, we'll contact you before printing or finishing begins, so you can rest assured.
Our staff will run a quick check to confirm your submitted data is suitable for printing. If we find a significant issue such as insufficient resolution or un-outlined text, we'll contact you before printing or finishing begins. Please note that fixing issues may delay the start of printing/finishing, so please create your artwork according to the submission guide.
Yes, changes are possible before final design approval. Once approved, the order moves into printing/finishing, so changes or cancellations can no longer be accepted. Please review individual-print (variable data) content especially carefully before approving.
Yes, you can. We'll show you the finished design online or as a PDF, and printing/finishing begins only after your final approval.
Yes. Even without design data, if you tell us what you'd like on the card and how it will be used, we'll create a design proposal for free with a layout suited to your use case.
Generally, yes. We recommend 350dpi or higher for full-card design images, and 300dpi or higher at actual print size for employee card photos. When shooting with a smartphone, please avoid digital zoom and shoot in a well-lit location.
Yes. Please send us your original logo data, the AI reference image, and the correct text to appear on the card. If you have other assets such as photos, please include those as well.
No. AI images are used as reference material to confirm the design direction. We create the actual print-ready artwork using your correct logo and text, adjusted for card size, resolution, and bleed.
Tell it the card's intended use, your preferred colors and mood, the content you want on it, and the logo position. Specifying "a photo-realistic mockup image" or "a flat design of the card surface" makes it easier to communicate what you have in mind. See our Guide to Using Generative AI for details.
Because monitors (RGB) and actual printing (CMYK) represent color differently, some difference may occur. Due to the nature of printing, an exact color match cannot be guaranteed — thank you for your understanding. This effect is more pronounced for artwork submitted in RGB.
Once your order is finally approved, changes to the IC chip type or magnetic stripe specification cannot be accepted. If using these cards with an existing system, please test compatibility with your actual hardware in advance.
If you need data written (encoded) to an IC chip or magnetic stripe, please submit it in text or CSV format. If linking it to a roster list, you can also specify it within an Excel file.
Personal data such as photos and rosters you provide is used only for card production, shipping, and necessary support, and is managed appropriately in accordance with our privacy policy. If you have specific requests regarding how your data is handled, please contact us in advance.
For sample requests, quote requests,
and other detailed questions, please use our contact form.